
How trade works
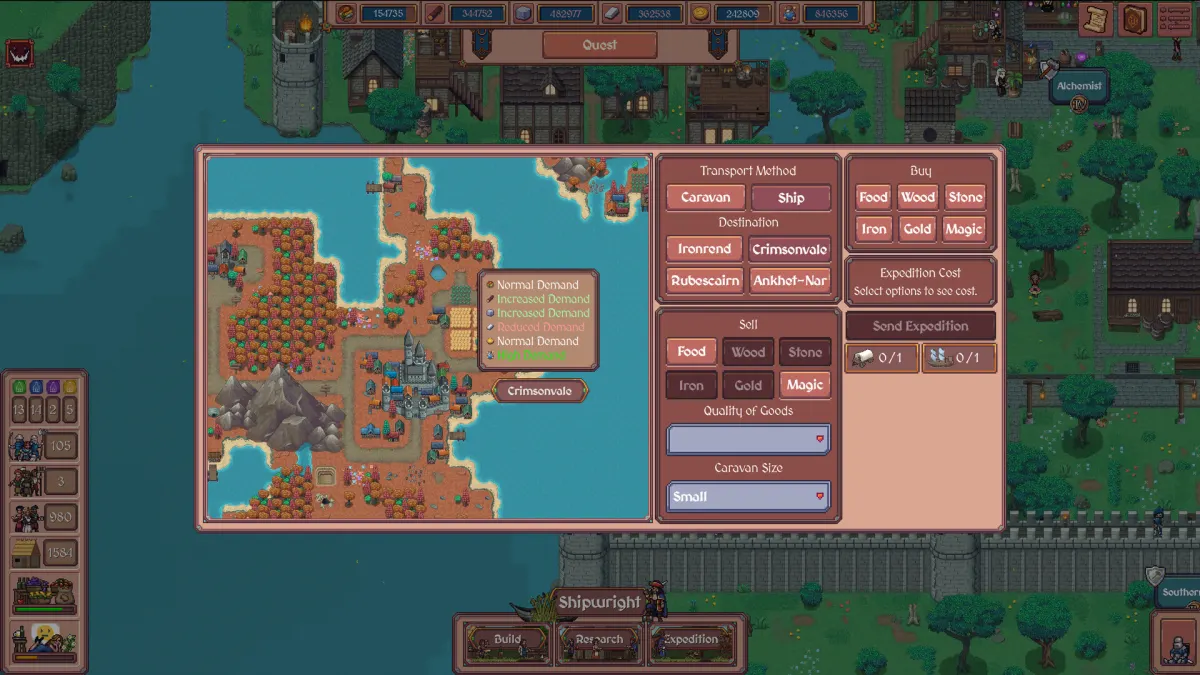
Trading runs through the Shipwright's Expedition menu rather than a market building. You assemble each run piece by piece: pick a transport method (Caravan or Ship), choose a destination kingdom, select which of the six goods - Food, Wood, Stone, Iron, Gold, Magic - you are buying or selling, then adjust quality and caravan size before confirming. The cost box stays empty until a loadout is complete ("Select options to see cost"), so a route's true price is revealed inside the panel, not from an external price sheet.
Read before you send: because costs only display once options are selected, toggling one choice at a time is the fastest way to learn what each leg of a route actually charges.
Trade also depends on production. Every crate you ship out is a good your workers gathered first, so if labor allocation is still unstable, fix that baseline before diverting output into expeditions - our tips and tricks guide walks the starting split.
Destinations & transport
The destination map in the current release build shows four kingdoms - Ironrend, Crimsonvale, Rubescairn, and Ankhet-Nar - each reachable by Caravan or Ship. Transport choice feeds into the expedition cost shown in the panel, though the exact numbers depend on the full loadout you have selected.
Does distance matter? The developer answered this directly in the Steam trade thread: “Profits don't directly change by distance; it just takes longer,” adding that shorter trips still win on economics because “the less travel time, the less supplies and wages you need.” Pick routes for the demand tags first, and treat travel time as a supply-and-wage surtax rather than a price modifier.
One boundary still holds: no official source publishes per-route price tables or caravan-versus-ship efficiency numbers. The base values below and the live cost readout are what we have; treat any fixed route-by-route profit table you find online as stale or invented until it can be reproduced in the current build.
Reading demand tiers
Every destination carries a color-coded demand tag for each good. The labels below were read directly from the in-game legend, so they are the terms the interface itself uses:
| Legend label | Visual cue | How players read it | Suggested stance |
|---|---|---|---|
| High Demand | Bright green | "Very high" in forum shorthand - the best price band | Prime target: sell here first |
| Increased Demand | Green | Mildly favorable market | Reasonable secondary sell target |
| Normal Demand | White / neutral | Baseline pricing | Skip - margins rarely justify the trip |
| Reduced Demand | Red | "Low" - weakest market | Avoid selling; consider buying here instead |
Whether further tiers exist above High Demand has not been documented publicly. Why the same tag can pay differently between goods is now partly explained, though: the developer confirmed hidden per-good base values (basics at 1, Iron at 1.5) sit underneath the demand system. Judge each route by its legend tag plus the live cost readout rather than by memorized numbers.
When a trade is worth it
The community's filter for when a trade is worth sending is now developer-confirmed. Asked about it in the Steam "Tips for trade?" thread, Phorust replied: “Yeah, you are all correct. The highest trade profits will be made when you: sell things in high demand, buy things in low demand.” He added that off-tier trades still turn a profit, “just a lot less,” so a marginal route is a slow path to income rather than a mistake.
- The rule, confirmed: “normal or low demand, don't go for it - high and very high demand, go for it” - and the developer endorsed exactly this reading.
- Goods have hidden base values: per the developer, “wood, stone, food = 1, Iron = 1.5, etc. These are hidden variables, but they also play a role.” Iron shipments are worth structurally more than the same stack size of basics.
- Like-for-like trades can profit: the developer confirms selling Food and buying Food in the same trip earns a small margin if your goods are higher quality - “like trading Wheat for Corn.”
- Demand decays after you sell: players observe that each completed sale drops that good's local demand by one tier, so dumping the same cargo into the same kingdom twice yields less the second time. One exception reported in the thread: food demand from the warring states stays High no matter how many times you feed them.
- Rotate targets: spread sales across goods and kingdoms so at least one high-demand lane is always open.
What's official vs observed: the sell-high/buy-low rule, the hidden base values, and like-for-like trades are developer statements from August 2026. The one-tier demand decay and the warring-states food exception come from the same thread's players - watch the tags in your own save and trust what they show.
Trading past the gold cap
A practical quirk surfaced in Steam discussions: a completed trade can push your gold above the normal storage ceiling. Players ran into it while diagnosing gold-related task bugs and found that trade income landed regardless of the cap that otherwise clamps deposits. If a milestone wants more gold than your treasury can hold, routing it in through a sale is the community's go-to workaround.
Treat it as opportunistic: this overflow behavior is a player-discovered workaround, not a documented feature, and a future patch could close it. Confirm it still works in your build before relying on it for a timed goal.
Hitting the cap from the other direction - storage too small for a quest payment - is a progression problem with its own checklist. The buildings guide covers the manor, blueprint, and library upgrades that raise it, plus the rare bug that makes an upgrade silently fail.
Two achievements revolve around trade
| Achievement | Requirement | Global unlock rate | Planning takeaway |
|---|---|---|---|
| Merchant Kingdom | Trade with Distant Kingdoms 20 times | 59.4% | Lands naturally if you keep sending regular expeditions |
| Steadfast Resolve | Complete the game without ever trading with Ashenholt | 5.2% | Among the rarest achievements globally - commit to closed routes early |
More than half of all players have earned Merchant Kingdom, which tells you routine trading is nearly unavoidable. The flip side is Steadfast Resolve at 5.2%: almost everyone who finishes the game touches Ashenholt at least once. If you want the rare one, decide at the start of the save that those routes stay shut - the condition spans the entire game, and one hurried expedition quietly ends the attempt. There is mercy in the rule, though: the developer confirmed the tracker is per saved game, so a spoiled attempt only costs the current playthrough, not your account. Our achievements guide has the full ruling and run pairings.
Trade FAQ
How do I trade for magic?
Through an expedition, not the research panel - and that is the trap. The quest that asks you to acquire magic by trading sends you to the Shipwright: start a trade expedition and use the buying side of the trade screen, where magic sits among the six goods you can purchase. Two players have now described spending an hour hunting for a “trade magic” tech before the developer clarified in the Steam thread that you simply choose to buy magic on the right-hand column of the expedition screen. The related research does exist - Magical Trade Goods - but it lives in the Magic Academy branch, not the early research flow, and the quest description was reworded in a patch to point at the trade step. That branch's nodes and requirements are broken down in our tech tree guide.
How do I get another caravan?
Additional transports are not bought outright - they come through research. In the one Steam thread on the question, a player who had dispatched the starting caravan once and burned through its goods was told by another player that extra caravans, and later ships, unlock via research once the relevant building is upgraded to the required level. Two logistics notes from the same answer: a trip's full cost is charged up front when you dispatch, and the caravan itself is not consumed - it returns when the trip ends and can be sent out again. That answer is community-written; the developer has not replied in the thread.
Can I specialize fully in trade?
One Steam player reports abandoning wood and stone production entirely, living on trade plus minimal iron, gold, food, and magic. It is a self-imposed playstyle rather than a designed path - keep enough domestic supply buffered that a failed expedition cannot starve the settlement.
Does trading with anyone break Steadfast Resolve?
No - the achievement only forbids trading with Ashenholt. Trips to Ironrend, Crimsonvale, Rubescairn, or Ankhet-Nar stay safe. Ashenholt was not among the four destinations in our captures of the current build, so treat it as a power you may meet later in progression and verify against your own map.
Where can I see exact trade prices?
Exact costs appear only inside the expedition panel once a full loadout is selected - no official table publishes per-route rates. What the developer has revealed is the layer underneath: hidden base values per good (wood, stone, and food at 1, Iron at 1.5). Compare routes live, and re-check them after updates.
Does reduced demand recover after I sell?
Recovery behavior is not documented. What players observe is the opposite edge: each sale drops the good's local demand one tier - with one reported exception, food demand from the warring states, which stays High no matter how many shipments arrive. That is why rotating across kingdoms beats dumping everything in one port.
Is it worth trading early in a run?
Only on genuinely favorable tags. Early surpluses are small and production chains fragile, so most players hold expeditions until High Demand appears in a nearby kingdom - and use them to convert a glut of one good into income for the next unlock.
Sources
- Hearth and Hamlet on Steam (Phorust Studios) ↗
- Tips for trade? - Steam thread with developer answers on demand tiers and item values ↗
- Where is research to trade magic? - Steam thread with developer answer on buying magic via expeditions ↗
- How can I obtain another caravan - Steam thread (community answer, developer unreplied) ↗